
porch & exterior, part 8: building the screens
05.06 - 08.06 one !@#$%&! frame at a time
 click to see the full photo galleryEven though we'd had the house painted, there were a few things left undone out of necessity. Among the undone items: twelve custom window screens. The reason for leaving the screens off the painting contractor's "to do" list was simple: our windows didn't have any.
Well, that's not entirely true...a few of them had screens, and we had frames for several others, but they were all in such horrible disrepair -- torn screens, warped joints, rotted or completely disintegrating wood -- that it wasn't worth salvaging them at all. It wasn't like they were the originals, anyway.
That meant rebuilding them -- some 1x2s, a groove for the screen, some miter joints, some paint, some screen spline, the screen of course, some fasteners, and voila! Screens! It really is a simple project, although doing it for a dozen windows is frustrating and it takes a lot of time. Thankfully, Sal took meticulous measurements for each of the windows and spent a lot of time making sure each frame fit its corresponding window exactly. That really paid off in the end, because once we'd gotten them all painted and splined, we just had to install them, no minor adjustments or anything.
Okay, so how did we do it?
Well, as I said, Sal took very detailed measurements for each window on all four sides. We've learned the hard way that with an old house especially, you can't count on anything being straight or plumb or square. Sal also made an allowance for the paint, since that's been our downfall before on similar projects and we've had to go back and trim it down to fit. And because he's all kind of awesome, we notably didn't have to do that this time.
First, he cut a groove down the center of all the wood trim we were using for the frames with a dado blade, which would be used for sinking the spline into later on. Then he cut the individual pieces, cutting miters on both end for each one (we made sure to carefully mark each piece as we cut it so we'd know what window and side of the frame it was meant for). Our spline was 1/8", so he used the same size dado, assuming that once those grooves were painted, the thickness of the paint would make sure the splining would sit in there nice and tight. He also shaved off the bottom inside edge of each frame since our window sills angle downward. By trimming that inside edge of the wood trim to the same angle as the window sill, it ensured the frame would stay snug in the window.
It's a lot easier to paint straight pieces than the frames once they're assembled, because you can do several pieces at once, so I primed and painted everything -- all sides, including the spline groove, which took forever. Since they still had to be assembled and fitted into place -- and all that handling meant they'd get dinged, there'd be touch-up work later, but I still think it was more efficient to do the priming and painting before assembly.
From there, it was a matter of assembling each frame . It took a few tries to figure out what fastener would work best; we tried those wavy metal things you hammer into the end but they just split the wood mercilessly. Flat L-brackets would keep the frame from sitting snug in the window frame, so we finally opted just to use the trim nailer, two on each side of the corner. The nice thing about that, at least, is that it sinks the nail/staple into the wood so you can fill the hole with putty and give it a nice finished look.
So from there we did the touch-up work and fitted each frame into the various windows. Not a single one needed to be redone or even adjusted -- they were all so perfectly fitted that we didn't really need to secure them with fasteners (although we did because, hello, cats from hell). That's some awesome measuring right there, people.
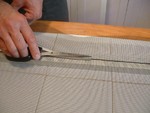
Anyway, the screen spline stuff is pretty easy. (This site has good step-by-step instructions.) You just cut the screen to the size of the window frame (leaving extra on all sides), then unroll however much spline you need, place it over the groove (with the screen underneath, and then using a spline roller, you push the spline down into the groove to secure the screen in place. It took both of us to do it -- Sal holding the screen in place while I did the splining -- and it takes quite a bit of force to get that spline in there all the way. You also have to be careful not to stretch it too tight, or you'll pull up the opposite sides you've already done. And yes, we learned that the hard way.
After that, you trim off the excess and your screen is good to go. We used simple eye hooks to secure the screens to the inside of the window sills, simply because we just knew that no matter how tightly those frames fit in there, Hobbes wouldn't rest until he'd managed to push one of those frames out of the window and make a break for it. Yessir, he's our own furry little Houdini. And sure enough, while we were fastening the dining room windows and working our way around the house, he managed to push the kitchen window out in the 2.5 nanoseconds we left him unsupervised. Kids!
For the first time since moving in, we could open all of our windows and leave them open during the hot weather without worrying about bugs getting in or cats getting out. And we even had screens for our basement windows! That might not seem like a big deal, but we'd spent four and a half summers with most of the rooms closed up or at best, having a window barely cracked open. You don't realize how big a deal it is to be able to open a window in hot weather until you can't. Seriously...getting the screens done was almost as much of a victory as getting the house painted.
Of course, we also have a screened-in back porch that, due to the painting, wasn't exactly screened-in anymore, so all of that had to be done, too. In that case, we didn't build frames, we just stapled the screen directly around the window openings in the porch and then covered it with thin trim pieces all the way around. That actually takes almost as long as building frames, just because you still have to custom cut everything and prime and paint it all, nail everything up, then putty and touch up. But again, measurements are your friends.
That still left the back porch screen door to do...but that project deserves an entire post all its own because dudes, seriously? Sal is the King of Carpentry and he deserves to be properly adored.