
attic, part 4: taping & mudding
09.04 - 01.05 i heart drywall mud
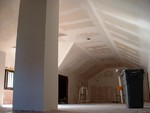 click to see the full photo gallerySo we finally finished getting the attic drywalled. Every single nook, cranny, and/or crevice. And it was quite the job. It's not that the taping and mudding job was worse, just that it was a bigger job. The room itself is roughly 700 sq.ft. and it took almost 1300 sq.ft. of drywall to get the walls, slants, and ceilings done. For reference, that's forty (40!) 4'x8' sheets, which had to be delivered on a flatbed truck. (And getting them from the street up to the attic? Not good times.)
Remember that we had a good start on the taping and mudding thanks to Malinda's diligent work when she and Dad helped us wire the attic and got the drywall started for us. But they, being very smart people, focused their attentions on the back third of the attic, stopping just before where the dormer section cuts in and the general laws of geometry cease to apply.
Once we finished the attic closets, we really started on the taping and mudding in September but then our social calendar -- yes, I laughed when I typed those words -- kind of got in the way and we weren't able to get back to work until after Thanksgiving. We did work upstairs intermittently during the holidays, but again, we were all socialus interruptus so the attic didn't get our full attention again until after the 1st of the year.
The spacing of the rafters and knee wall studs necessitated using drywall sheets cut into smaller pieces, which equates into many, many, many seams. We're not so sure the seams didn't secretly couple up at night and reproduce like rabbits. In fact, there're only two sheets in the entire attic that didn't have to be cut down. Not to mention several seams that had large gaps almost an inch in places and in others, the two pieces on either side weren't close to flush with each other. Understand, this wasn't because of sloppiness on our part, just the nature of the space we were working in. And, as if we didn't already have a bunch of other issues to deal with, the two rough wooden beams that delineate the dormer, which had to remain exposed and weren't rough in that really cool, trendy loft way so as to be left untouched and natural, wouldn't hold onto the drywall mud we tried to coat them with. (We eventually conquered that particular challenge by covering them with a very wet skim coat, waiting for it to start to harden, then quickly wrapping them in mesh tape and holding it in place until the mud hardened. Once it set, we had a good foundation for the successive coats of mud; it took about seven layers to finish them off nicely.)
The mudding part is actually pretty fun, and if that were the only part of the job, we would've actually looked forward to all the work to be done. But along with taping and mudding comes sanding and that, my friends, is a sucktacular crapfest. It's messy and wearying and takes forever (especially on that first coat!) and the dust gets absolutely everywhere.
Now we knew before we even started that we were going to texture the walls because everyone told us that was the easiest thing to do considering the size and difficulty of the job. So we didn't have to spend all the time we did on the seams, but hello, perfectionists over here. The end result, of course, is that the seams turned out beautifully and all those places where it seemed like we'd never be able to disguise the irregularities and gaps disappeared seamlessly (heh) into the wall.
And remember all that trouble we had with the ceiling where the two beams for the dormer cut into the main room of the attic, all the wailing and gnashing of teeth about how to cut the sheets and get them to fit just right? Check out the picture gallery for evidence of how much we rocked the hell out of that whole thing.
Out of all of this, we're particularly proud of the tricky section where the dormer knee walls & ceiling slants, main room knee walls & ceiling slants, and wooden support beams all come together. On each side, there was a triangular section where we fit small pieces of drywall that to be blended at angles on all edges. But the rights side of the dormer in particular was especially difficult as there wasn't much structural support to screw the drywall piece into and the final result ended up sinking the triangular piece a half inch or more behind the rest of that wall. We weren't sure we'd ever be able to disguise the resulting indentation completely but after lots and lots (and lots) of coats, we're quite pleased with the outcome.
After all of our hard work, we seriously considered not texturing at all. We think it turned out that good. But there are a few places where no amount of diligence could disguise a crooked angle that shouldn't be there and we decided it'll be best to stick with our plan and texture. We have, however, decided to make it considerably thinner than originally planned. And in the case of the chimney, which is perfectly smooth all the way around, we did decide to leave it untextured.
Altogether, it took six 50 lb. boxes of mud, one 50 lb. bag of hot mud mix, and four smaller 5 lb. buckets of drywall compound to do the entire attic. What remained from all of that fits in a small covered yogurt container that we laughingly call our "emergency reserve".