
guest room & studio, part 04: fixing the windows & ceiling
03.08 it's the little things that make the difference
 click to see the full photo gallery[NOTE: this project was done in conjunction with the library project.]
As with any project, the list of details to finish before you can get to the big stuff is long and aggravating. And as we're all aware by now, I'm sure, prep work generally annoys me.
Thankfully, the repairs to be done in this case weren't too onerous. There were several holes in the walls to be filled, some of them sizeable -- the PO had stuff hanging on the walls from top to bottom -- but the part that needed some attention to detail was the ceiling.
Both the guest room and closet had long cracks in the ceiling that needed to be filled before priming and painting. There's probably a proper way to fill cracks in an old plaster ceiling, but we just used spackle. The finish on the ceiling is super smooth so the main challenge was making sure the patch wasn't obvious. That's easy enough to do on a vertical surface, but a little harder when you're balancing on a ladder and working over your head. Literally.
We are very fortunate that the POs didn't replace the windows with some horrible aluminum framed crap and that most of the glass in the windows themselves is the original glass, wavy imperfections and bubbles and all. Sure, they're not terribly energy efficient, but we're fortunate to live in a temperate climate where freezing temps are rare and to have grown up in a climate that was downright brutal in the winter. Which is to say, it doesn't bother us much.
We've had to replace a few panes here and there, and that includes one of the tri-panes in the closet window, which had a half-inch hole right through the center since the day we moved in. The upstairs attic window had a similar hole, one of the basement windows was cracked, and one of the back porch doors was missing its window altogether. Cracked and broken glass is probably inevitable in an old house, but the round holes...well, perhaps the POs were a family of gunslingers....
Anyway, the closet window was repaired when we had the house painted, so we didn't have to worry about the hole any longer by the time we started on the interior of the room and closet. But we did need to do something to protect from sun fade and give us privacy. The POs had some thin curtains covering the window when we moved in, but we didn't want to cover up the window if we could avoid it -- the point of keeping the original windows is so that you can, you know, see them. And no way we were going to put the cheap contact paper window film stuff on them.
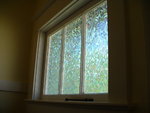 click to see the full photo galleryAfter some research, I came across this manufacturer of decorative glass films. They had the perfect solution for our problem not just in the closet, but for the casement window in the living room (which has the same problem, except it does get lots of direct sunlight since it faces south). Not only do they have a nice variety of marvelous design options that look nothing like vinyl film, they don't require any nasty adhesive that would leave a bunch of gunk on our old glass if/when we removed the film.
We opted for one of the mosaic cut glass patterns, which would give us complete privacy but lots of light. It's priced by the foot and the width was just a little too short to do the full width of the two windows, which meant we had to order extra length in order to have enough, but even so, the total came to just under $100. Well worth it for covering two windows and the overall effect is really nice. No one who's seen it in person can believe it's vinyl instead of some kind of textured glass.
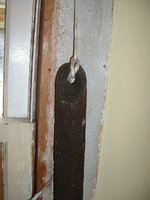
The other window was intact but the sash cords had long since broken so the window wouldn't stay open without a support. Most of the windows in the house had broken sash cords when we moved in, so it's not a new problem for us. It's surprisingly easy to fix, as long as you're careful. The window trim has to be removed, so you have to be careful not to damage either the trim or the wall plaster behind it.
Once we had the trim off, it was just a matter of replacing the old sash cords with new. We also had to replace one of the sash weights, but thankfully, places like Hippo have (original) sash weights in abundance. (You can get more newly-made sash weights, but why would you want to when you can get old ones? And I love the sounds they make when they're moving up and down in the casements. They sound like old bells.)