
bathroom, part 2: floor tile
04.04 learning the hard way since 2002
 click to see the full photo galleryWe knew as soon as we moved into the house that we wanted to tile the bathroom floor. It already had those peel and stick tiles and although they weren't exactly us, they weren't hideous or anything. What we wanted, though, was a nice slate or ceramic floor using 12x12 tiles. Very classic and clean.
Since tiling is a relatively simple home improvement project, and since we couldn't afford yet to get the bathtub re-location/shower install done, we decided we'd tackle tiling the floor next. We'd only be able to do two-thirds of it -- the tub has to be moved out of the way and the plumbing for the tub and shower have to be roughed in before we can finish that side of the bathroom -- but we could at least do the rest of the bathroom.
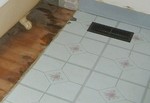
First things, first, though. That peel and stick tile had to come up (easy) but underneath was some kind of glue and cardboard thing (not so easy). It's too bad they used whatever that glue stuff was because the bathroom has the original hardwood floors and probably would've been really cool if we were willing to invest in the time and sweat of refinishing it. It also would've meant waiting until the bathub could be relocated so we could do the whole floor all at once. So we quickly got over the idea.
Our original plan of using slate meant driving all over the tri-county area looking for the right color range we wanted (dark grey). Lots of places had it, but not within spitting distance of our price range. We even spent almost three hours in Lowe's while the sales guy tried to find the kind the one that we wanted, to no avail. Even though it was ON DISPLAY with THE PRICE WE WANTED and included a STOCK NUMBER, apparently, their warehouse inventory system catalogs product using a random number generator. Either that, or their display consisted of stock items that they don't actually sell.
That meant a new plan. We'd seen a lot of great tile ideas at several tile showrooms in town, but all of it was way out of our price range. Then Sal came up with a great idea of using those little hex tiles in white with small black hex tiles here and there. Which was a brilliant idea, of course, since they'd be in keeping with the style and period of the house and would still go with the vintage spa look we want the bathroom to have. Not to mention being easier to install since they come on the little mesh backings so you don't have to use spacers or special thinset.
The next morning, we head to Home Depot at 7 AM, trying to explain what we're looking for to a high school kid who doesn't even know what a hexagon is, let alone a hex tile. We did finally find it in their catalog and showed it to him, but they don't keep those in stock, which meant a special order and special price to go right along with it. "Special", as in "expensive". More expensive, even, than the tiles we'd seen at the tile showroom. Which is weird, since they're pretty much the same size as those little one inch tiles that are like, ten thousand for a buck.
So we're now in the middle of Home Depot on a Saturday morning, which might as well be in the middle of a toy store on Christmas Eve, trying to figure out what to do. We decide finally on 12x12 black ceramic tiles, but we can't be happy with just a plain grid, oh no. We just have to make it special, make it ours somehow, without busting our budget. I had a flash of inspiration -- using 4x4 white tiles with the black to create a kind of herringbone pattern. We even found these fantastic textured white tiles, just to give it a little, well, texture.
You'd think by now we'd learned to make things easy for ourselves. Considering that our bathroom has these three recessed sections on one wall, a built-in cabinet to work around, and some custom wood trim that was going to require special cuts, we should've made things simpler by sticking with an easy grid, especially since we'd have to use spacers and special thinset for the unusual underlayment. (Since we had a hardwood floor to work with and not enough clearance to add the usual plywood subfloor, we had to find an alternative. Sal did some online research and found that we could use the heavy-duty PVC sheeting they use for tub/shower liner instead of the plywood and actually, that turned out to be an even better underlayment than wood would've been, anyway.)
The herringbone pattern was pretty easy, though we had to use a lot of extra spacers due to the different size tiles in order to keep everything straight. But it was all the special cuts that really got us. We went through an entire box of tile before we finally conceded defeat and rented a tile saw. We stayed up all night doing all of our special cuts -- me measuring and Sal cutting so we didn't have to rent it more than 24 hours. And while he was doing that, I did all of the regular cuts with a nifty little manual tile cutter contraption that was worth every penny of the 25 bucks we spent on it; don't even bother with the little glass cutter tool they say you can use because "they" are lying to you. Trust me on this.
We used a dark charcoal grout, though we were tempted to add the glow-in-the-dark powder you can buy because that? Would've been so awesome. Eh, even though we chickened out and don't have a glow-in-the-dark floor, we're pleased with how it turned out and anxious to do the rest so we can get to the next phase of the bathroom renovation.